
Home Improvement
How to Remove Remax Trimmer Head BC200DL Easily

Maintaining your gardening tools, such as the Remax Trimmer Head BC200DL, is key to ensuring they last longer and perform better. For DIY gardeners, landscaping professionals, and home improvement enthusiasts, learning how to remove the Remax Trimmer Head BC200DL is essential. This trimmer head is a go-to tool for trimming grass and weeds, but over time, proper maintenance – including removing and cleaning the head – ensures it continues to operate smoothly.
This guide provides a comprehensive step-by-step process for removing the Remax Trimmer Head BC200DL, offers practical tips, and addresses common pitfalls to help you complete the task with confidence.
Understanding the Remax Trimmer Head BC200DL
Features and Components of the Remax Trimmer Head BC200DL
The BC200DL trimmer head is designed for efficient cutting and durability. It’s compatible with many string trimmers, making it a preferred choice for gardeners and landscapers. Key features include:
- Sturdy build for both professional and home use.
- Universal compatibility with a variety of trimmer brands.
- Easy restringing system for quick tool maintenance.
Importance of Maintenance and Removal
Routine maintenance of the trimmer head is crucial for optimal performance. Dirt, grass, and debris build up over time and can obstruct the functionality of the head. Removing the Remax Trimmer Head BC200DL allows you to clean it properly, replace worn parts, or restring it as needed. Neglecting regular removal and maintenance could lead to reduced cutting performance or damage to the trimmer.
Preparing for Removal
Safety First
Before beginning the removal process, follow these safety precautions to prevent accidents:
- Turn off the trimmer and disconnect it from any power source to avoid accidental activation.
- Wear protective gloves to shield your hands while working.
- Keep the area organized to ensure tools are within reach and obstacles are out of your workspace.
Tools You’ll Need
To effectively remove the Remax Trimmer Head BC200DL, gather the following tools and equipment in advance:
- A wrench or pliers.
- A flathead screwdriver.
- A soft cloth for cleaning.
- Replacement parts (if needed).
Step-by-Step Guide to Remove Remax Trimmer Head BC200DL
Follow these detailed steps to safely and easily remove the trimmer head.
Locate the Trimmer Head
Identify the location of the trimmer head on your device. The Remax BC200DL head is usually at the base of the shaft, connected to the spindle.
Secure the Trimmer
Place the trimmer on an elevated, stable surface to prevent it from rolling or tipping over. Use clamps if necessary to secure it during the process.
Unscrew the Retaining Nut
Using a wrench or pliers, loosen and unscrew the retaining nut placed on top of the trimmer head. Remember, some models require turning clockwise to loosen, so check the manual for specifics.
Remove the Trimmer Head Assembly
Slide the trimmer head off the spindle carefully. If it feels stuck, gently tap the sides with the flathead screwdriver to free it. Avoid using excessive force, as this could damage the components.
Inspect and Clean the Components
Once the head is removed, inspect it for wear and tear. Clean all parts thoroughly with a soft cloth to remove dirt and debris. Replace any damaged components as necessary.
Common Mistakes to Avoid
- Forgetting to disconnect the power source could lead to accidents.
- Using excessive force increases the risk of damaging the trimmer head.
- Misplacing small components like the retaining nut. Keep them secure while disassembling.
Tips for a Smooth Removal Process
Handling Stuck or Stubborn Trimmer Heads
If the trimmer head is stubborn and won’t come off easily, try the following tips:
- Use penetrating oil to loosen rusted or tight components.
- Gently tap around the base while turning the nut for added leverage.
Post-Removal Maintenance
To keep your trimmer head in great shape after removal, follow these best practices:
- Clean and dry the components thoroughly before reassembly.
- Regularly lubricate the spindle to prevent rust and ensure smoother rotation.
- Store the trimmer head in a dry place when not in use.
You May Also Like: Benefits of Using XCV Panels for Energy Efficiency
Conclusion
Routine maintenance and careful handling while removing the Remax Trimmer Head BC200DL will ensure continued reliability and peak performance from your gardening tool. Taking a proactive approach to care saves you time and money in the long run.
By following our comprehensive guide, you’ll be well-equipped to maintain your trimmer and tackle all your gardening tasks with confidence. For any replacement parts or further assistance, consult the device manual or reach out to experienced professionals.
FAQs
How do I remove the Remax Trimmer Head BC200DL if it’s stuck?
If the trimmer head is stuck, apply penetrating oil to reduce friction or use light taps with a screwdriver. Ensure not to damage the spindle.
Do I need special tools to remove the Remax Trimmer Head BC200DL?
Basic tools like a wrench or pliers and a flathead screwdriver are usually sufficient. Check your trimmer manual for specific requirements.
How often should I remove the Remax Trimmer Head BC200DL for maintenance?
It’s recommended to remove and clean the trimmer head every 2–3 months, depending on usage frequency and exposure to debris.
Can I reuse the trimmer head assembly after removal?
Yes, as long as the components are in good condition. Inspect the parts for damage and clean them before reassembling.
How can I replace the string on the Remax Trimmer Head BC200DL?
After removing the head, pull out the worn string and insert a new one according to the trimmer’s instructions. Ensure the string is wound tightly.
Remodeling a small bathroom is one of the most impactful updates you can make in your home, both for your personal comfort and for your home’s overall value. Smart layout decisions, light-enhancing materials, and clever use of storage can transform a confined space into a retreat that feels open and inviting. Whether you are planning a full renovation or specific upgrades, maximizing every inch is key. If you are seeking expert help or inspiration for bathroom remodeling New Hampshire, there are local professionals who specialize in small-space solutions, ensuring results that are both beautiful and practical.
With a blend of strategic design elements and modern fixtures, you can create a small bathroom that punches well above its weight in terms of style and utility. Light colors, streamlined storage, and the right materials work together to open up the space visually and enhance its daily function. Never underestimate the difference that natural light and smart organization can make in high-traffic areas like bathrooms.
Before you dive into your project, consider how layout adjustments, fixture updates, and lighting schemes can work together to deliver the biggest return on your investment. A combination of aesthetic and practical improvements will make your bathroom a pleasure to use for years to come. Remember, even modest updates can yield a space that feels fresh, modern, and spacious.
From selecting the perfect paint to installing mirrors and storage that make the most of every corner, small bathrooms are packed with potential. A thoughtful remodel can create a more open, relaxing environment even in limited square footage.
Opt for Light and Neutral Color Schemes
Choosing pale and soft shades such as white, eggshell, or powder blue can make a dramatic difference in small spaces. These hues reflect light better than darker tones, creating an airy, open feel even in windowless bathrooms. For surfaces, gloss or semi-gloss paint and tiles will bounce light around, making the room look larger. Try incorporating a monochromatic color palette for a cohesive effect and a seamless flow between surfaces and fixtures. According to HGTV’s remodeling experts, lighter color schemes are among the easiest ways to visually expand a bathroom.
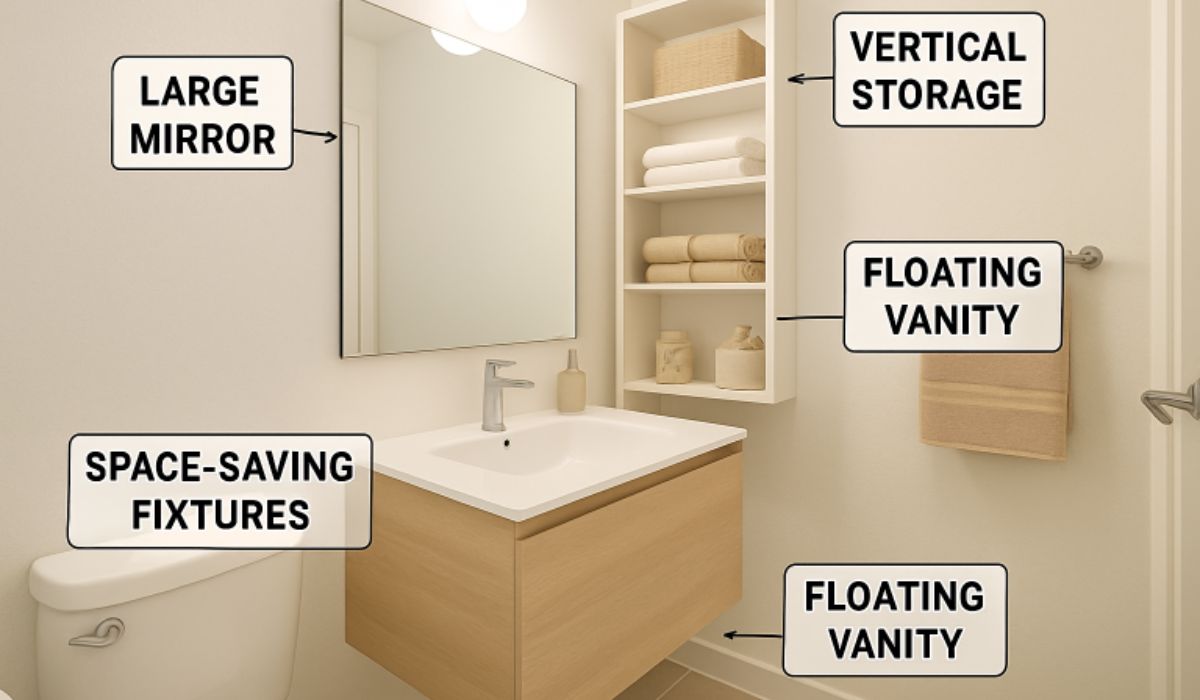
Choose Space-Saving Fixtures
When space is tight, every inch counts. Opt for wall-mounted vanities and compact toilets that expose more floor area, making the room appear less cluttered. Pedestal sinks, floating vanities, or corner sinks are particularly effective for maximizing floor space. Avoid bulky cabinetry in favor of slim profiles that maintain essential storage. Modern compact fixtures are designed to conserve square footage while providing all the necessary amenities for a functional bathroom.
Implement Smart Storage Solutions
Clutter can make small bathrooms feel cramped, so integrating creative storage is a must. Tall, narrow cabinets, built-in wall niches, and floating shelves maximize vertical space while keeping countertops clear. Storage baskets or organizers can also help group smaller items, protecting your surfaces from soap buildup or water damage. Recessed storage behind mirrors or within shower walls provides easy access without intruding upon floor or traffic areas.
Enhance Lighting
Lighting can instantly transform a small bathroom, both visually and functionally. Layered lighting serves different purposes. Ambient lighting provides general brightness, while task lighting over vanities or in the shower ensures sufficient visibility for grooming and self-care. Dimmable lights let you adjust the mood from energizing to relaxing. For bathrooms without windows, LED bulbs with a natural daylight spectrum help simulate sunlight, further enlarging the perceived space.
Utilize Large Mirrors
Using a broad, wall-to-wall mirror or placing a wide mirror above your vanity can double the visual space in a small bathroom. Frameless or thin-framed mirrors provide a sleek and contemporary look without adding bulk. Mirrors reflect both artificial and natural light, increasing the brightness of the room and reducing the impact of awkward corners.
Install a Pocket Door
Traditional swinging doors require clearance that can interfere with bathroom layouts or limit the placement of fixtures. A pocket door, which slides neatly into the adjoining wall, frees up valuable space for storage or movement. This simple change can provide additional shelving space or improve accessibility in a cramped layout.
Select Reflective Materials
Elements such as glass shower enclosures, high-gloss wall tiles, and metallic finishes on fixtures create a polished look while enhancing light reflection. Glass barriers, rather than opaque shower curtains, remove visual barriers, extending sightlines and making a room feel larger. Metallic hardware in chrome or brushed nickel adds a touch of elegance while contributing to the overall sparkle and airiness.
Incorporate Minimalist Decor
Less is more when you are working with limited space. Opt for a few carefully chosen accessories, like a simple vase, a splash of greenery, or a pretty soap dispenser, instead of filling shelves or countertops with clutter. Maximum function and clean lines will help keep your small bathroom feeling open and serene. Try to select decor items that add personality without overwhelming the room’s proportions.
With the right approach, small bathrooms can become some of the most stylish and impressive rooms in the house. By focusing on light, texture, and multipurpose fixtures, you can turn a restrictive layout into a functional oasis that feels spacious and fresh.
YOU MAY ALSO LIKE: Creative Basement Remodeling Ideas for Modern Homes
In today’s fast-paced world, modern plumbing solutions are transforming how homes function, blending technology and sustainability for optimal performance. These innovations not only help conserve water and energy resources but also reduce operating costs and extend the lifespan of household systems. Homeowners are increasingly turning to advanced plumbing features to create comfortable and environmentally conscious living spaces. If you’re looking to enhance your home’s efficiency or address plumbing concerns, connecting with a reliable plumber in your region is the best way to start.
From innovative plumbing technology to water-efficient fixtures, modern options are making it easier to monitor, control, and conserve vital resources at home. With so many innovative products on the market, it’s easier than ever to upgrade legacy systems for greater performance and peace of mind. As eco-friendly materials gain popularity, homeowners can adopt solutions that are both effective and sustainable.
Beyond personal savings, embracing advanced plumbing methods also supports broader environmental objectives, such as reducing urban water demand and lowering carbon emissions. Upgrading to intelligent, resource-conscious systems is a proactive step towards future-proofing properties. Whether you’re renovating or building new, working alongside skilled professionals in the industry ensures proper installation and maximum benefit from these upgrades.
For tailored expertise and prompt service, consider reaching out to local plumbers who are well-versed in regional building codes and the latest advancements in plumbing technology. Their experience enables them to recommend and install optimal solutions that match your home’s unique layout and needs.
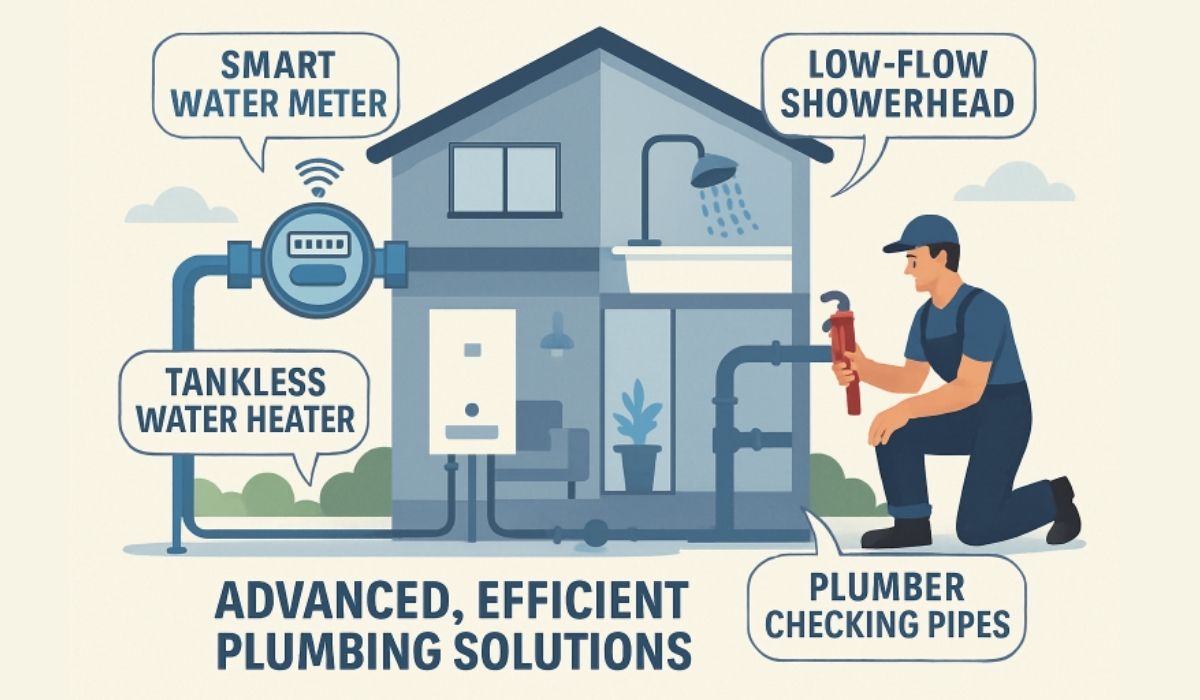
Smart Plumbing Systems
Integrating innovative technology into home plumbing systems represents a significant leap forward in proactive water management. These innovative systems utilize Internet of Things (IoT) sensors to monitor water flow, detect anomalies, and alert homeowners to potential leaks in real-time. Remote access from mobile apps allows users to shut off the water supply instantly if an issue is detected, minimizing potential water damage. According to a recent review by The New York Times Wirecutter, smart leak detectors are among the most effective tools for preventing major disasters and keeping utility bills under control.
Eco-Friendly Fixtures and Materials
Sustainability is a prevailing theme in modern plumbing, with eco-friendly fixtures such as low-flow toilets and water-saving showerheads helping homes reduce unnecessary water usage. Contemporary faucets now feature aerators that maintain high water pressure while reducing the flow volume. Additionally, long-lasting materials such as PEX tubing are gaining popularity for their resistance to scale build-up and flexibility during installation—features that surpass those of legacy copper or PVC piping. These improvements not only reduce environmental impact but also drive cost efficiency for homeowners.
READ ALSO: PLG Supplies: The Secret Toolbox for Products That Sell Themselves
Tankless Water Heaters
Energy conservation takes center stage with tankless water heaters, which warm water only when it’s needed rather than maintaining a large hot water reservoir. This on-demand approach significantly minimizes standby energy loss. As highlighted by the U.S. Department of Energy, homes equipped with tankless models can achieve energy savings of up to 34% compared to conventional storage heaters. Their compact form factor also frees up valuable space in utility closets or basements, making them a perfect choice for modern, energy-conscious families.
Advanced Leak Detection Technologies
The cost and inconvenience of water damage can be substantial, with even small leaks causing long-term structural issues if unaddressed. New-age leak detection options now include ultrasonic sensors, advanced moisture detectors, and automated shut-off valves, all designed to react quickly to emerging problems. These systems can detect moisture behind walls or beneath floors—areas previously impossible to monitor effectively. Early intervention prevents more extensive repairs, helps conserve water, and maintains overall system health.
Regular Maintenance and Professional Services
Professional maintenance remains essential for maximizing the longevity and efficiency of modern plumbing technologies. Skilled plumbers offer comprehensive inspections, routine cleaning, pipe re-sealing, and fixture upgrades. Not only do these services catch potential problems early, but they also optimize water flow and pressure throughout the home. Homeowners are encouraged to partner with trusted service providers for regular checkups and advice on upgrading aging infrastructure. By doing so, you’ll ensure your system continues to meet today’s efficiency standards and delivers uninterrupted performance.
Embracing modern plumbing innovations allows homeowners to significantly improve comfort, efficiency, and long-term reliability within their homes. Advanced technologies, water-saving fixtures, durable materials, and innovative maintenance solutions work together to reduce waste, lower utility costs, and prevent unexpected repairs. These innovations also support environmental sustainability by conserving water and energy without sacrificing performance. By staying informed about the latest developments and partnering with skilled, experienced professionals, homeowners can make confident upgrades that enhance daily living. The result is an eco-friendly, cost-effective plumbing system designed to remain resilient and dependable for years to come.
YOU MAY ALSO LIKE: Simple Changes to Upgrade Your Home’s Plumbing System

Creating a well-equipped kitchen is fundamental to streamlining meal preparation, making home cooking more enjoyable, and upgrading your results. The right equipment not only cuts down on cooking time but can also help you work more safely and confidently. From carefully chosen knives to innovative appliances, every tool serves a unique purpose in transforming your culinary routine. To further improve your kitchen workflow, consider learning how to take care of knife essentials to ensure longevity and safety.
Whether you’re a novice eager to build your first set of kitchen gear or a seasoned cook looking to optimize your process, investing in quality tools pays dividends in ease and efficiency. A thoughtfully equipped kitchen minimizes clutter, fosters precision, and inspires creativity with every meal. As modern cooking demands rapid meal preparation without compromising on flavor or nutrition, a few well-chosen items can make a dramatic difference.
Multifunctionality and ergonomic design are key traits to look for. Items that serve multiple purposes or save space help you cook with less clutter and stress. Embracing smart kitchen investments—and properly maintaining them—will streamline both daily meals and more ambitious culinary projects.
High-Quality Chef’s Knife
A sharp, durable chef’s knife is the cornerstone of any efficient kitchen. A quality blade makes chopping, slicing, and dicing easier and safer. A well-maintained chef’s knife drastically reduces food prep time and enhances precision. Regularly honing, sharpening, and storing your knife correctly will keep it performing at its best for years.
Ergonomic Cutting Board
Pair your chef’s knife with a reliable, non-slip cutting board. The ideal cutting board provides a stable, durable surface that keeps your blade sharp and your fingers safe. Wooden or high-grade plastic boards are gentle on knives and easy to sanitize, helping prevent cross-contamination in busy kitchens. Look for models with juice grooves or antimicrobial features for added practicality.
Digital Food Scale
Precision is a foundation of consistent cooking and baking. A digital food scale enables precise ingredient measurement, which is crucial for portion control and recipe accuracy. Beyond baking, a scale is handy for meal prepping, ensuring all portions align with dietary goals. Choose a scale with a clear digital display and easy-to-clean surface for hassle-free regular use.
Multi-Functional Food Processor
A high-performance food processor simplifies complex tasks like chopping, slicing, grating, pureeing, and even kneading dough. Modern processors combine multiple blades and attachments, often handling the work of several gadgets in one compact unit. Appliances such as the Cuisinart Custom 14-Cup Food Processor let you prep everything from salsa to pastry dough in seconds, reducing manual labor and cleanup time.
Immersion Blender
An immersion blender, or hand blender, is essential for anyone who loves making soups, sauces, or quick smoothies. Compact and versatile, it allows you to blend directly in the cooking pot or container, minimizing dishes. Options like the KOIOS 5-in-1 Hand Immersion Blender include attachments for whisking, chopping, and even frothing, making it a multipurpose tool in a small package.
Air Fryer
An air fryer can dramatically reduce cooking time and fat content without sacrificing flavor or texture. These appliances utilize powerful convection to achieve perfect crispness quicker than traditional ovens. Models like the Ninja Crispi are particularly suited to compact kitchens, offering multi-functional settings like baking, roasting, and warming food in addition to air frying. Health advocates and culinary experts alike praise air fryers for their combination of speed and versatility.
Measuring Cups and Spoons
Accurate measuring tools are indispensable for reproducible results in both savory and sweet recipes. Invest in sturdy, easy-to-clean sets with clear measurement markings. Metal or heavy-duty plastic sets are durable options that withstand frequent use and dishwasher cycles. Having a full range of cup and spoon sizes within reach boosts efficiency and ensures your recipes turn out as intended.
Organizational Tools
Maximizing kitchen efficiency requires keeping your workspace tidy and items accessible. Stackable mixing bowls, nesting measuring tools, and integrated colanders, like those found with the Joseph Joseph Nest 9 Plus, conserve space and make it easy to grab what you need. Drawer organizers and wall-mounted racks further reduce clutter, transforming even small kitchens into streamlined workspaces. By equipping your kitchen with these essential tools and focusing on quality maintenance, you’ll simplify meal prep, elevate your culinary results, and truly enjoy your time in the kitchen. Smart kitchen investments, supported by reliable guides and dedicated care, ensure that your kitchen remains a pleasure to use for years to come.
Conclusion
Building an efficient kitchen is not about filling every cabinet with single-use gadgets, as it is about selecting high-utility, ergonomic tools that simplify the transition from raw ingredients to a finished plate. When you invest in a precision chef’s knife, a versatile food processor, or space-saving organizational sets, you are doing more than just buying hardware; you are investing in culinary momentum. These tools eliminate the friction of prep work, allowing you to focus on the creativity and joy of cooking rather than the labor. Ultimately, the most successful kitchen is one where form meets function. By prioritizing quality over quantity and caring for your equipment, you create a professional-grade environment that is both safe and inspiring. Whether you are aiming for faster weeknight dinners or more precise gourmet results, the right tools act as a force multiplier, transforming your kitchen into a streamlined space where great meals happen effortlessly.
YOU MAY ALSO LIKE: Designing Your Dream Home: Creative Ideas and Practical Tips

How Ski Wax Science Helps You Glide Further

Best Practices for Long-Lasting Asphalt Surfaces

Eye-Catching Sign Design Tips to Attract More Customers

How to Navigate the Home Buying Process with Confidence

Driving Test Tips for a Smoother Road Test Experience
-

 Home Improvement1 year ago
Easy Ways to Clean and Maintain Your Foam Play Mat
-

 Celebrity1 year ago
Who Is Andrew Santino Wife? The Full Story
-

 Tech1 year ago
Explore iZoneMedia360 .Com Features & Benefits
-

 Entertainment1 year ago
Remembering Melanie Olmstead Yellowstone’s Unsung Hero
-

 Uncategorized1 year ago
Prairie Dog Guide: Habitat, Behavior, and Conservation
-

 Celebrity1 year ago
A Deep Dive into Jeremy Allen White Movies and TV Shows
-

 Apps & Games1 year ago
The Pizza Edition Games: A Perfect Slice of Fun and Flavor
-

 Business1 year ago
How Influencersginewuld Shapes the Future of Branding